

How to make maki sushi?
Welcome! This guide will walk you through the steps of making a your first maki sushi roll. We also have a salmon maki recipe with guided steps and pictures here.
1. “The rough side of the nori”
Feel the nori sheet from both sides and you will find one side to be a bit smooth and the other a little rough. The nori should lay on the rolling mat with the rough side facing upwards.
2. “Getting busy with rice”
Get your hands wet, and make about a handful of rice to a ball of rice. It’s important to keep your hands wet while working with sushi rice because it is sticky. When you work with the nori though, you should keep them as dry as you can. That is why you should have a bowl of water (with a bit of rice vinegar added to it) and a dry hand-towel nearby when making sushi.
3. “The spread”
Gently put the rice ball in the middle of the nori sheet, and start spreading it equally on the nori, creating a layer of rice covering almost the entire sheet except the upper margin of about 2 cm that should be kept uncovered. Later on, the margins need to be empty of rice in order to close to sushi roll properly. Be careful not to compress the rice, but merely spread it over the nori.
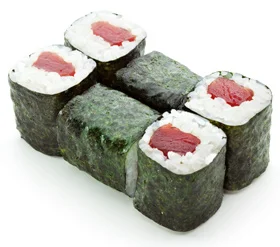
4. “Can you fill this?”
Let’s lay down the roll filling, for example a slice of sushi grade tuna, on the edge of the nori. You can add a slice or two of vegetables, you might want to use a long slice of avocado or maybe cucumber for this especially on stops to allow it to roll tightly.
5. “Commence the rolling sequence”
Using the closer edge of the rolling mat, close on the filling with the nori making a rectangular shaped hill and tighten it from above.
6. “Continue the rolling sequence”
Move forward, continue rolling in the rectangular hill steps, keeping it tight with every move until you reach the end of the nori. Put pressure on the roll from all three sides at all time, especially on stops to allow it to roll tightly. Make sure you tighten the roll moving from the ends to the center. Be careful not to squeeze out the roll filling.
7. “And….cut!”
Use a wet, sharp knife to cut the roll in to little sushi units. 6-8 units per roll – that’s your call. It is useful to keep the knife wet when in between, that helps cutting through the rice and nori.
8. “So, how can I start…?”
Well, the best thing is to get sushi equipment and ingredients to start with. You can probably everything you need your local asian food store. If you’d like to browse for ingredient and accessories online, check out our sushi e-Store, for sushi kits and more. You might also want to know how to prepare sushi rice, or to read more about sushi grade fish for your sushi roll.

can I make my own Sushi vinegar! as I brought the wrong Sushi vinegar it was brown and no flavouring to it!
no you cant sushi vinegar is made exlusively by the sushi vinegar gods
Thanks for the information! My friends and I tried making sushi last night and we found your site very helpful. We made a few different types of maki and, while none were perfect, everything tasted great and we had so much fun! We will definitely be making more and learning as we go!
The rice recipe was perfect. I just could’nt get my maki to roll and close correctly. Had to eat each piece with a spoon! More help with the rolling mechanics please! Thanks.
oh and by the way, can you provide some more advanced stuff about how you make sushi? like the really hard rolls, so i can try them out for one of my friend’s birthday parties?
Thank you for providing information on sushi, my favorite food! I will definitely enjoy my once horrible sushi now!
Thanks for the recipes. Maki sushi sounds strange to me but I know of other sushis. I’d love to try it though. Nice read!
What a great site. I really learnt a lot from here. Thanks!
The site was a great help! It was my first time making sushi at home and I couldn’t have made it without this site! ❤️ Thanks
Thanks Mila, so great to hear! Enjoy your sushi 🙂
Hello,
I’ve made sushi a few times, but always have to refer to a book or online for the rice seasoning recipe. In doing so this time, I came across your website. I was happy I did! I had never made the spicy tekka and would not have know where to start. Your spicy tuna sauce was a hit at my dinner. SO delicious. And the rice seasoning was perfect. I will be bookmarking this site for future reference. Thank you!
Beep
Hi, thanks for the great guide, especially the animations! I need to make enough sushi to feed 3 people (I’m thinking 4 pieces each), could you suggest the amount of fish and rice I will need?
Thanks,
Zach W.
Hey Zachary,
Thanks for the kind words.
From my experience, 2 rolls per person is a good amount. So if you want to make 6 rolls, that would require 2 cups of rice, and 450g of fish should do.
Good luck, and feel free to share some pictures.
BOIIIIIIIIIIIIIIIIII
Love the graphics, this certainly makes it easier to try and follow! Let’s hope it works out now, if not at least I can always rely on local favourite Japanese restaurant. http://rofuto.co.uk/
Hey there, first of all congrats for the site, really cool and helpful.
Can someone please help me here, i´m preparing a sushi party for 7, well 7 good eaters so let´s make it 10 😉
my doubt is the amount of ingredients to use, rice, fish vegetables etc..
Help pleaseeeee . . . _ _ _ . . .
Horácio Contador
Hi Horácio, Thanks for visiting. If the party is still on, you might want to use the following estimation. An average person consumes about 2 rolls in one sitting. A cup of rice will suffice for 3 rolls, and you’d want 75gr of fish per roll.
So for 12 people I’d get 1.3kg of rice, and 1.8kg of fish.